Photoshop Tutorials Pinned
453 replies · 142027 views
I needa tutorial to do this..Duplicate the layer, use greyscale on the new layer then change it to soft light in the palette. Blur it, merge the layers and then sharpen it but if it doesn't look good sharp, leave it blurred.
<{POST_SNAPBACK}>
I do all these steps and i dont get the same result <_<
you can fade the blurring and sharpening actually you can fade anything by going to edit /fade.
Can anyone teach me how to do this in photoshop cs

Um...skaterboyVs12 is wa wondering from wich video did u take ur avi? 'Cause it's great 
Oh its from the vh1 special the wonderful life of supermodels
Uh? I have that video but i guess i just forgot that was in it  Sorry lol and thanks
can someone please tell me how i can do my borders like that and make my letters like thats too please

Does anyone no how I can resize images at the same time instead of oe by one for example when trying to do gifs
from lox tutorial on making gifs http://www.bellazon.com/main/index.php?showtopic=800
I've made a little photoshop-action to do that. Making actions is really easy. All you you need to do is to create a new action, press the record button, you do what you have to do on the first pic and then press the stop button. You have now a model of the tranformations to perform on each other pic.
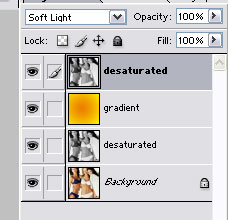
Screen capt of the actions window in photoshop:
after you do that click file-> automate-> batch...in there a window will pop up and choose the action you want to do and the file the pics are in and click ok and you should be set to go
ThanX neo that helps a lot
but one question hoe do I do this part
I've made a little photoshop-action to do that. Making actions is really easy. All you you need to do is to create a new action, press the record button, you do what you have to do on the first pic and then press the stop button. You have now a model of the tranformations to perform on each other pic.
Screen capt of the actions window in photoshop:
can anyone please tell me how I can get this effect in photoshop
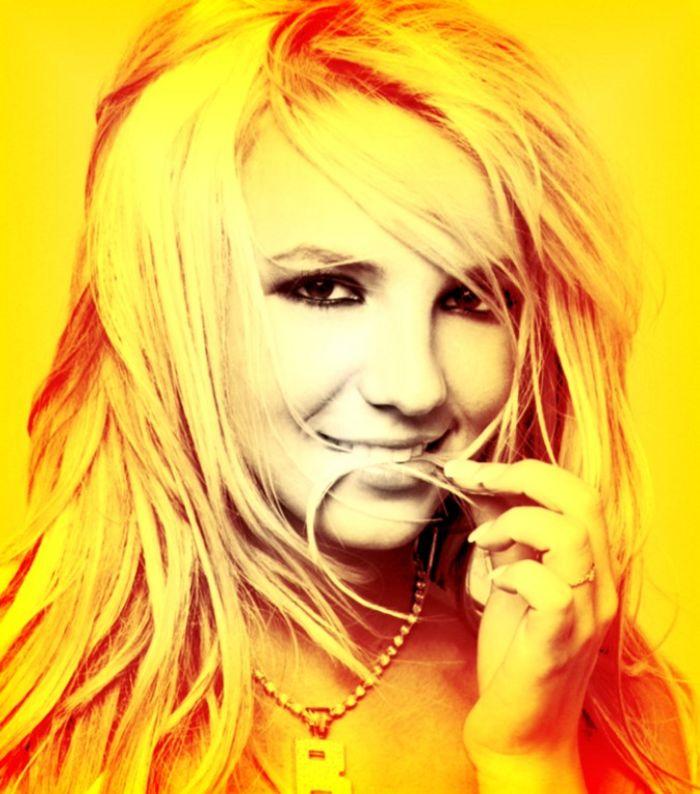
I'll throw one together when I get home from class.
thanx
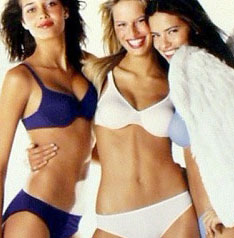
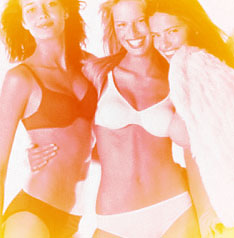
Alright, first pick your image. I'm going with this one:
Now, the first thing you do is duplicate the layer by going to Layer > Duplicate Layer. After that, desaturate your image (ctrl+shift+u or Image > Adjustments > Desaturate).
Next, create a new layer and fill it with a gradient of your choice. I used this one:
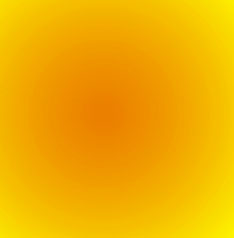
For the effect on the image you gave, they used a radial gradient by the look of it (To make a radial gradient, there's a button beside where you pick which gradient that has a circle in the middle. click on that one).
Set that layer to Lighten (on your layers pallette where it says NORMAL, use the arrow to select LIGHTEN). After that, you'll have something like this:
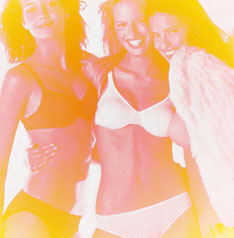
Now, duplicate your greyscale image and move it to the top, setting it on SOFT LIGHT.
You'll end up with something like this:
To get the fade in the middle, duplicate your greyscale again and set it on normal. Next, go to your marquee tool (it's a little dotted box) and hit the small triangle next to it and pick the circle, up top, set your feather to about...30 or around there. Select the center of the image and inverse your selection (shift+ctrl+i) then delete the selected area.
Fade that layer down (changing the opacity on your layers pallette). After setting it on 50%, I got this:
It's not the same exact thing, but I think it depends upon the image you're doing the effects to.
thanx a lot avadakedavra thats what i was looking for thanx again
Hey  I just wanted to know, is it possible to put in a gif into, lets say, a non-animated siggie?
And if it is possible, how?
Here's an example of what im talking about...credit to FT for it .

That signature is animated, it's just a small part of the image that's animated.

HeyAnd if it is possible, how?
Here's an example of what im talking about...credit to FT for it
essaye
J'crois qu'il faut une version de PhotoFiltre que j'ai pas pour
That signature is animated, it's just a small part of the image that's animated.
Oh. then can somebody explain to me how i make an animation with Photoshop CS2(yeesss finally got it today 
 )...or to just put a gif into a normal image